Sunday, December 22, 2019

Therapy Dog Calendar Photo Shoot at CAMH

Action shot of Abby for CAMH's 2020 Therapy Dog Calendar. We might not have captured many frames of Abby but we loved the sense of motion and personality in this frame, and we only needed one winning shot per dog!

I am a big fan of mental health and hope to have it some day. Ha-ha! In the meantime having a sense of humour will have to do. In all seriousness, though, Toronto is very fortunate to have driving progress in the realm of mental health "Canada's largest mental health teaching hospital and one of the world's leading research centres" (CAMH website) -- Toronto's Centre for Addiction and Mental Health, or CAMH. One of their many stand out initiatives is the Clinical Volunteer Program, a subset of which is the Pet Therapy Volunteer program. So far there are over 60 dogs and volunteer owners certified to participate. This year they decided to produce a calendar to promote the program and thank donors, sponsors, partners and participants.

The idea was to showcase a broad spectrum of breeds and sizes so people would get an idea of the variety of dogs involved, and for the sake of visual variety in the calendar. There was some concern that people with similar breeds may feel left out but I understand the number of people and dogs available for the selected shoot day worked out pretty much perfectly so that no one was slighted.

Prior to the shoot date we headed off to CAMH's Queen Street Site to scout for suitable shooting spaces. I am very much in favour of environmental portraiture (for people and animals), so I loved their spacious, hilly garden around the back. (No pics to show, I'm sorry! I knew that as the sun moved and the light changed during a day long shoot we would be moving all over the place so there wasn't much point taking scouting snapshots.)  Plan B, in case of inclement weather, was to shoot inside against a gray background. Had there been a suitable indoor environmental background for our Plan B I would have suggested it but there wasn't. Sometimes budget and logistics allow for a weather day. This wasn't one of those times.


Fantastically uninspiring meeting room (no offense CAMH!) in which we ended up shooting.

I hoped fervently for good weather, but as the date approached it became pretty clear we weren't going to get it. (The weather the week prior to the shoot was perfect, of course!) It actually turned out to be a very good thing we didn't have the chance to shoot in the garden because the day of the shoot the garden, or at least the area around the garden, was under construction, so this would have negated a number of potential angles and backgrounds, and the noise and activity would have been incredibly distracting for the dogs, and likely for the people.

Apart from the aesthetics I don't love photographing dogs on seamless paper because their paws tend to slip on it, but alas that was what we had to do. And I'm happy to say, even though it wasn't what I'd hoped for, the pictures turned out beautifully, with the added bonus that certain bits of retouching required were facilitated by the plain background (eg. removing a dog owner's arm from the frame).

One notable retouching situation that was not helped by the gray background was the fixing of Toulouse's scarf. CAMH therapy dogs have a uniform -- a small purple scarf, and originally the thought was that as long as the purple scarf showed to some extent, people would know it was the CAMH Therapy Dog Program scarf. It was understood that it wasn't reasonable to expect that the scarves would be perfectly styled and oriented in every shot as every time the dogs moved the scarves moved, the dogs changed their orientations to camera continuously, and the scarves fit every dog differently. An owner would position a scarf to one side for a slight profile shot and the dog would flip around showing his other side and obscuring the scarf completely. We knew this would happen and there wasn't a retouching budget big enough to make 13 scarves look perfect. However with little Toulouse, in particular (below), the scarf was almost invisible in the select, so I was asked to see what I could do. Thankfully there was another shot in which he was standing on a similar angle and the scarf looked good. So I was able to do some "magic" and fix the shot.


Left: The select with the scarf barely visible. Right: A frame in which the dog is in a similar position and the scarf looks good.

The final retouched image for the calendar.

We scheduled half an hour per dog. In some cases we got a usable frame in as few as three exposures, which was a good thing because in some cases that reflected about how long the dog was was willing to be in front of the camera. At some point I was reminded of the fact that when I was a kid I was afraid of dogs, thanks to a few bad experiences. Funny that I would grow up to specialize in dog photography (among my other specialties). If the dogs I'd met as a kid had been like these dogs, particularly the shy, sweet Enya (below) the idea of being afraid of dogs would have been even more ridiculous. 

Mostly while trying to photograph this beautiful Irish Setter we saw this.
One of very few frames we captured of this camera shy beauty. We all loved the ear flick.


In other cases we captured multiple great frames. Some dogs weren't worried about the camera or the set at all and just wanted to have fun.

This wasn't the only frame that had a person in it. They were easily retouched out.

I loved this shot, albeit we didn't get to see his cute little face, which is why it didn't make the cut.

While some dogs were overflowing with energy, some were a little more laid back.


A couple of outtakes in which the subjects were a bit too relaxed.

After every few dogs we would have to refresh the background paper (seamless) as it got slobbered on, scratched and dirtied. We had canned air to blow the shed fur off but that only helped a bit. I wasn't about to change the paper for every dog as that would be wasteful, and we'd use up too much paper, so we compromised, rolling out and cutting off the wrecked section every few dogs so that retouching wouldn't be a total nightmare. As it happened, we actually did use up most of a roll (of 9ft wide seamless).

We were looking for a variety of looks so there would be some variety between calendar pages: ie. headshots, full body sitting, full body standing, walking, etc. Some dogs gave us lots to choose from. Some made us laugh. Some were hilariously awkward, as if they had never been on a photo set before in their lives (which they hadn't)!
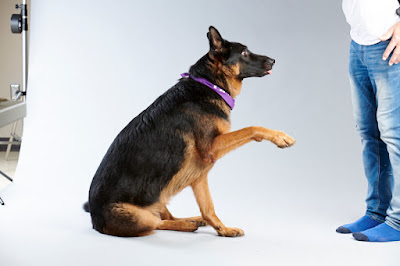

The camera is over here!

Talk about one of the best dog portrait shoots ever. Trained to be around people in a therapeutic way these dogs made this shoot seem like 13 dog therapy sessions in a row for those of us working on the set that day.

In case this is helpful, here are a few things we look for when photographing dogs:
- when standing 4 legs visible if possible (not 1 leg blocked from view by the leg closer to the camera resulting in a 3 legged look),
- if the dog is lying down legs are towards camera not away from; if away the dog looks like a legless sausage
- if sitting the dog should be on about a 45 degree angle so you can see front and side of dog, and if you get it just right the family jewels are discreetly blocked from view,
- main light on the face,
- sense of movement can be nice,
- ears up,
- alert expression,
- eyes toward the camera or just off camera axis,
- 'smiling', not a super long tongue if the tongue is out (there's cute tongue and there's stressed/dehydrated/exhausted tongue...we want option 1)

In our case for this calendar we needed the dogs to fill each frame more horizontally so a sitting pose was just too vertical for many of the taller dogs in cases where we were shooting full body.

This girl did a perfect sit but we couldn't use the shot for the calendar's horizontal layout.

Obviously I've included only a  few of the final  calendar images here. Anyone lucky enough to get a copy of it can see the rest. I believe the print run this year was limited by various circumstances. Hopefully if there's a 2021 calendar the print run will be bigger and the calendar will be made more widely available.


I'm so looking forward to doing this again next year.  Maybe with luck the garden will be back to being the peaceful place it is sans construction and the weather will be perfect!

Since doing this shoot, my family has adopted a dog, so I'm hoping to be able to have him join the program in the future (after he turns 1 year old). I've seen first hand the effect that pet therapy can have on people who are receiving care for mental illness. CAMH's therapy dogs and their volunteer owners bring comfort and joy to patients in treatment programs throughout the organization. If you're interested in applying contact Theresa Conforti, Coordinator, Volunteer Resources Clinical inpatient and pet therapy.

In the meantime, if you need professional photography of animals, or people, please get in touch!

kathryn@hollinrake.com
hollinrake.com


Monday, November 18, 2019

The Art of Jamie Brick

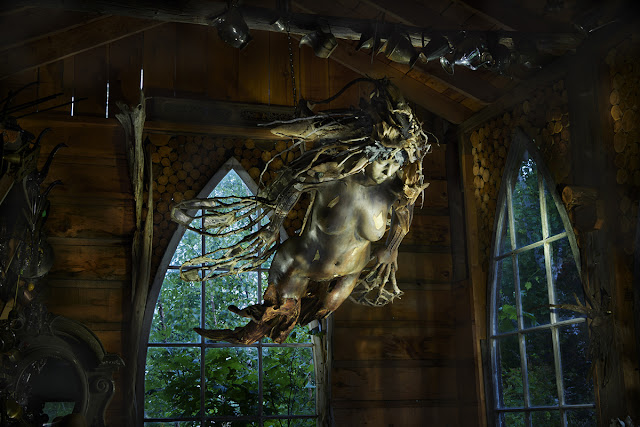
Damsel Fly by Jamie Brick

Sometimes I feel as if I have a terrible memory, but I remember very clearly the day I discovered Jamie Brick's sculptures and met the artist himself. It was at what may have been the very first iteration of  "The Artist Project", then held at the Liberty Grand when a mere 150 artists were selected to exhibit. (The annual February show now includes more like 300 artists at the Better Living Centre.) Jamie's sculptures are wonderfully whimsical, unique and creative and appealed to me immediately. (And yes, I have photographed him, and written about him before.) Note before I continue: to see larger versions of the final images of Jamie's art shown in this post please visit my website.

This year, when it came time to start thinking about next year's calendar I had a brilliant idea while visiting Jamie's studio during a stay in his and his wife Annette's rental cottage on their property on Draper Lake.

This isn't the cottage. It's Jamie's studio which is next to the cottage.
Here's a view from the cottage.

As (almost) always I needed a set of still life appropriate objects that would look good small (the calendar pages being less than 4 inches across) and make for pretty pictures, so I asked Jamie if he'd be interested in collaborating by allowing me to photograph some of his pieces. He agreed, to my delight. We were only at the cottage for a few days at the time so the idea was to do the shoots when we came back later for a two week stay. I needed time to plan, and I was going to need three nights in order to to accommodate two shoots per night (more on timing later).

Once we arrived, after the initial inertia of some long awaited down time, I had some choices to make -- which six pieces to shoot, out of considerably more than six compelling and available options. One deciding factor was shape. As much as I loved some of the more vertical pieces, I knew they would not fit well into the horizontal layout I had to work with, so that helped shorten the list! Then there was the issue of the 3D-ness of his work, it being sculpture, after all. The richness of detail in any one piece could not possibly be captured in a  2D image, so there were some tough choices to make in terms of the best angle to shoot. Jamie's work often features fantastic little 'surprises', so in cases where one special detail featured on the front of a piece while another little gem featured on the back of a piece, I had to pick one to show. This decision making process was somewhat excruciating.

In one case I shot the whole series of frames* of a piece called Here comes Santa Claus, then changed my mind about the angle and had to start again. It seemed that showing the fork antlers to their best effect meant compromising the depiction of the Santa figure. Funnily enough, as soon as I wrote these words and put the final image (below right) beside the base image for version 1 (below left) I suddenly doubted I'd made the fight choice, so went back to the RAW images and 'built' a final version from the frames shot of the first angle. After all that I decided I really didn't like version 1 and had been right to change the angle during shooting, so score one for second guessing!

Left: first angle I tried (not the final composited image). Right: The final image created after I changed my mind, changed the angle and reshot. This was the only piece photographed inside Jamie and Annette's house. Funny note: we moved the teapot in the dark so didn't see the giant thumbprint we clumsily created on it; that had to be removed, somewhat painfully, in Photoshop.

*The actual photography process involved my signature still life lighting style, about which I've written before, and which involves shooting multiple frames of a given object, each lit differently, then combining bits and pieces of those frames later in Photoshop to build the final image. During the shoot my challenge is to previsualize how the frames will come together later.

Backing up a bit, the step following the selection of the subjects was to choose six locations on the property in which to photograph these sculptures. One of the six, the life-sized, Damsel Fly (final image at the top of the post), could not be moved because it was suspended from the studio ceiling. There was pretty much one angle that worked, so not a lot of decision making was required for this image (at least in terms of angle).


This is where the Damsel Fly hangs in Jamie's studio, photographed before the real shoot began. Shooting one frame in daylight (or available light) gives me a back-up source for overall detail, so if I miss any spots with my lighting where I feel there really should be some detail I can pull it from this frame. You can see a ghost of me walking into the frame.
This shows how dark it was by the time I finished photographing. Part of this frame went into the final composition.

The Mermaid, also life-sized, was pretty much going to need to be shot where she stood, also in Jamie's studio. I photographed her right after the Damsel Fly, so by this time it was getting really dark, and the mosquitoes were out, and inside(!) in full force. I made the laughable mistake of thinking that because I was 'inside' I would be protected from them, so chose not to wear insect repellent (which I hate, anyway), but the studio is not at all sealed. It was hot, I was sweating, I was being bitten to death, and the batteries in my flashlight were wearing out. Fun. Thankfully I just managed to capture the final frame before my light became unusable. (Yes I had extra batteries...I just didn't want to go and get them when I was so close to being done!)

This shows one frame that went into the final composition. There are distracting elements including a piece of wood on the wall behind the sculpture's shoulder that needed to be digitally removed and lighting artifacts that needed to be excluded.
I've lightened and circled the gumball machine that was just barely visible in the shots, but needed to be retouched out later.

In the studio, to the left of the Mermaid there was a black vertical space with no detail, because there was no detail to show. I knew that wouldn't work in the final image, so I took a picture of the door (left) outside the studio during daylight hours to provide me with a source of textures to add in later. I've lightened and circled the fixed area in the almost final image (right) to illustrate the change. It's darker in the final image, so subtle, but necessary.

The final Mermaid image

The other four sculptures could all be moved, so during daylight hours I scouted the property to figure out where to set up once it started to get dark. I couldn't put them outside and leave them there much before shooting as they wouldn't be safe on the ground. This is another reason the timing was so critical. The ideal window is right around dusk and shortly after, so there's minimal available light, but not a complete absence of it. If I'd had two large, sturdy, heavy-duty tripods and two cameras it would have been great to be able to at least set them in place during daylight hours, but I had one of each with me. Once it gets really dark, the process gets much more difficult, but I didn't want to limit myself to one shot per night and spend six of my holiday evenings working and missing the sunset cruises on the 'floaty boat' (see the final shot at the bottom of the post), so I settled on shooting two per night -- one in perfect circumstances and the second one less so.

Wide angle view of the location for Go ask Alice

Positioning test shot of Go ask Alice as dusk approached

Go ask Alice final image

Behind Jamie's studio where I shot Beach Patrol and Dragon Fly. (You can see Dragon Fly on my website.)

Beach Patrol final image

Of course these images are not my art, they are depictions of Jamie Brick's. But I hope that by imaging them the way I have, I will have been able to give viewers who don't have the chance to see them IRL some access to their their beauty and detail, and for viewers who have seen them a slightly different experience of them. Can you really see the detail properly in my tiny calendar, or here for that matter? Probably not really, so if you'd like to see them bigger and better please go to my website.

I'll leave you with a view of the lake during some unsettled weather right at the beginning of our stay.


Fun, filtered phone pic from the dock


And one final good-bye view as I sail off to my next shoot.


Sunset cruise on the 'floaty boat'.

If you rent the cottage tell them I sent you! And if I can make something look pretty for you please get in touch!

hollinrake.com
Jamie Brick
kathryn@hollinrake.com


Monday, June 24, 2019

Aerial Photography of Downtown Toronto


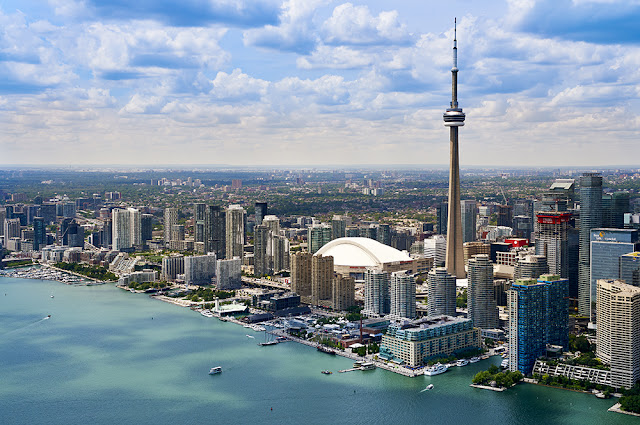
One of my first good views after take-off.

Readers of my sporadic blog posts may recall my writing of a somewhat disastrous attempt to capture shots of downtown Toronto from a  helicopter a few years ago. (https://khollinrake.blogspot.com/2016/11/ill-fated-attempt-at-aerial-photo-of.html) They were shot on spec for a regular client of mine who had a repeated need for images of the city featuring the CN Tower. One year later, same project, same potential requirements, I arranged on my own again (on spec again) to get up into the sky. This time I booked a flight on a Cessna 172 with Island Flight School and Charters. They have pilots working on accumulating their hours who will fly you around at least somewhat per your instructions for a designated period of time, in my case just over half an hour.


Getting ready for take-off.

Of course one of my must haves was an opening window through which I'd be able to shoot. The window is hinged at the top; once you tip it up and open, the force of the air keeps it in place. Funny story: many years ago I'd gone up in a small plane to take some pictures and I allowed the front of my lens to pass through the window out into the air flow. The gelatin filter I had mounted in front of that lens blew off and away so fast I learned my first hard lesson almost as soon as we were airborne. This time, I knew not to stick the lens out of the window and to keep it inside just shy of the external wall of air.

Facing northwest.

Our flight path consisted of repeated circles over downtown with the goal of capturing a variety of angles that included the CN Tower. Weather was, inevitably, an issue. I partly lucked out and partly did not. The great news was that the sun was shining and cloud cover was limited. Puffy white clouds tend to enhance blue skies, and dappled light can be much more interesting than straight sun, depending on the ratio of clouds to clear sky and where the dapple falls. But dappled light created by moving clouds constitutes a very hit and miss proposition, which can be frustrating. If I'd had the budget to keep flying it might have been less so.

Facing south-southeast.

Each go around the pilot varied his altitude so I could capture slightly different views. All the while I was painfully aware of the creeping and gradually increasing cloud cover. I was also aware that thanks to this being a very short session the light would be coming from one direction for the whole shoot. This meant that the city would look more dramatic from some points of view than others -- sometimes the light would be raking across the buildings creating highlights on one side and shadows on the other, accentuating their shapes and textures (ie. more drama), whereas from other angles the sun would be shining straight down on axis with the camera (direct light), or even from behind (back light). Only when the sun was obscured by cloud did the drama really disappear, though, leaving the city looking flat and me disappointed.

Fairly flat light as the sun goes behind a cloud.

Because the annual report for which I was ostensibly shooting always included a focus on communities, I made sure to include a few neighbourhood views. I did not love this particular dapple (and the client didn't choose this image anyway), but I still like the shot.

A section of Toronto neighbourhoods.

At this point the light looked pretty flat, again, but it's still fun to see Church Street and Jarvis Street from somewhere other than in traffic.

Facing north showing Church St. to the left and Jarvis St. to the right.


Nearing the end of the flight the sun poked out again but there were big clouds in the sky causing dark shaded areas...bigger than I would have ordered. This shot is similar to the one at the top of this post but from a slightly higher angle showing more of north Toronto in the distance:

Similar shot to the one at the top of this post, but the plane was higher.

One of the last shots as the sky continued to cloud over and my flight budget ran out:


Given an actual budget I would have loved to have more time to wait for the clouds to move around some more, although they were obscuring more and more of the blue, and the sun, so returning another day might have worked better. In the end the client chose only one of these aerials for the project. But it was fun way to get some cool shots, which I now have to  share and license as I wish. So if you'd like to see more from this shoot and/or you would like to license one, or you'd like to send me up to get you some fresh images, please e-mail or call me. 

Thanks for reading!

kathryn@hollinrake.com
hollinrake.com